Grill Masters Club Ultimate Guide to Grilling Techniques
There are few joys in life as exquisite as expertly prepared food that has been cooked over a fire in the great outdoors.
Some of us get so excited for grilling season that we start scrubbing the grill and stocking up on charcoal, wood chips, or propane at the first sign of warmer weather. Others still grill, rotisserie, or smoke year round, regardless of the climate or season.
However, a passion for grilled food is only the beginning: a true Grill Master must learn and develop the proper grilling techniques to grill any meal in any style. To aid you on your quest to become a true Grill Master, we assembled this guide to raise your grill game to a whole new level.
If you are looking for even more help and inspiration, subscribe to our monthly BBQ subscription box, where you receive pitmaster-tested sauces and rubs monthly. Pitmasters everywhere are RAVING about it!
Get that charcoal going, soak those wood chips, and get your grilling machines in good working order because it’s time to learn the ways of the Ultimate Grill Master.
Direct/Modified/Indirect Charcoal Grilling
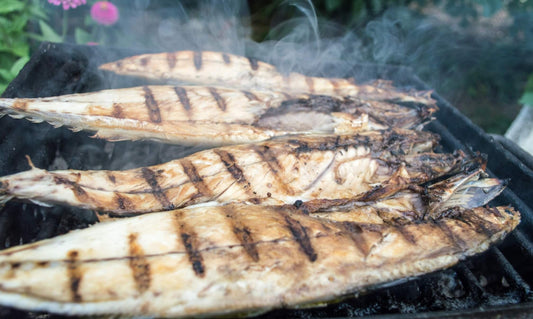
Direct Charcoal Grilling

Let’s start with the basic method that is most familiar to grilling aficionados: Direct Grilling.
Direct grilling involves cooking small cuts of meat or portions of food with cook times of 20 minutes or less in a closed top charcoal grill. Cooking with the lid on is essential for preparing food that is not scorched or unevenly cooked.
Open grill cooking means that you have a significant amount of heat loss while cooking, meaning your food will have hot and cold spots. Worse still, when a grill is open the airflow is unregulated, leading to flare ups from the coals that burn the outside of your food.
Direct Charcoal Grilling Techniques
Here’s how to properly execute direct charcoal grilling:
- Start by opening the lid and bowl vents all the way.
- Spread your burning briquettes (briquettes should be glowing) evenly over the grate.
- Carefully replace the cooking grate and place your food directly over the hot coals.
- Keep an eye on the temperature (most grills have a built in thermometer installed on the lid). If it starts burning too hot, trim the vent flows by closing them slightly.
Indirect Charcoal Grilling

While the direct method is great for quick dishes and food that needs to be in and out of the fire quickly, the indirect method is for dishes that take longer to cook such as roasts, bread, or cake.
This requires a little more prep, and the proper placement of coals is key to making this technique work well for you.
Indirect Charcoal Grilling Techniques
Here’s a rundown on how to perform indirect charcoal grilling techniques:
- As with direct grilling, begin by opening the lid and bowl vents all the way.
- Using a pair of tongs, arrange your glowing briquettes at each side of the charcoal grate.
- Pour a little water into a drip tray and carefully set it between the arrangement of hot briquettes.
- Lower the cooking grate back into place and set your food above the drip tray in the center of the grate.
- Pop the lid back on and wait for your food to cook for its allotted amount of time.
- Monitor the temperature as your food is cooking. If it starts to get too hot, trim the airflow by closing the vents a bit.
Modified or 50/50 Charcoal Grilling
 This third method for charcoal grilling is best for chicken breasts, game hens, and sausages. It requires a little more finagling of your briquette placement, but it is quite easy to do once you get the hang of it.
The 50/50 method allows you to seal the flavor inside with a proper sear over direct heat, then finish cooking over indirect heat.
Modified or 50/50 Charcoal Grilling Techniques
Here’s how to do it:
- Get your bowl and lid vents open to optimize the airflow.
- Put all your briquettes on one side of the charcoal grate.
- Put some water in a drip pan on the other side of the grate.
- Place the cooking grate, then sear your meat quickly over direct heat from the coals. Be sure to sear both sides.
- Once you have seared both sides of your meat, it can also be slid over to the drip pan side to finish cooking.
- Put any other food that needs to be cooked more slowly over the drip pan.
Voila! You have now three techniques to master for charcoal grilling. The type of technique you choose largely depends on what you are attempting to cook, but knowing how to implement all three grilling techniques allows you to vary your cookout menu over the course of the grilling season!
Direct / Modified / Indirect Heat Gas Grilling

The techniques for using a gas grill for direct, indirect, and modified or 50/50 grilling are pretty much the same as for charcoal grilling. However, rather than spreading your charcoal briquettes, you turn your gas burners on or off depending on which of the three methods you are employing.
Advantages of a Gas Grill: The advantages of the gas grill over the charcoal grill is that it takes less time to heat up, the temperature remains more constant, and it is easier to maintain a constant temperature.
Downside of a Gas Grill: The downside is mainly in flavor, but the debate of which is overall better is a fierce one.
Direct Gas Grilling

Direct Gas Grilling Techniques
Follow these techniques for Direct Gas Grilling:- Fire up all the jets/burners and max out the heat.
- Preheat for about 5-10 minutes with the lid closed.
- Throw your food on the cooking grate directly above the burners.
- Flip and remove as needed.
Indirect Heat Gas Grilling (Roast/Bake)

Indirect Gas Grilling Techniques
Here are some tips to help you with indirect gas grilling:- Light up all the burners and turn them all the way up.
- Preheat for 5-10 minutes with the lid closed.
- Shut off the middle burner and arrange food over the unlit burner.
- Turn the burners down to medium, and then close the lid.
- Remove from the grill after cook time has elapsed.
Modified (50/50) Gas Grilling
Modified or 50/50 Gas Grilling Techniques
Follow these pro tips for modified or 50/50 gas grilling:- Get all burners lit and going at full heat.
- Preheat for 5-10 minutes with the lid closed.
- Turn off the middle burner AND either the left or right burner as well.
- With just one burner on full blast, sear your food to lock in the flavor.
- Slide seared food over to the unlit side to finish cooking slowly.
Gas grills are better for quick meals cooked up outdoors, but they lack the flavor of the slower preparing and more work intensive charcoal grills. You can buy flavor-enhancing briquettes for your gas grill to give it a smokier flavor, but many grilling gurus feel that the flavor a charcoal grill provides makes it worth the extra effort.
As with all grilling techniques, how you grill is always entirely up to you!
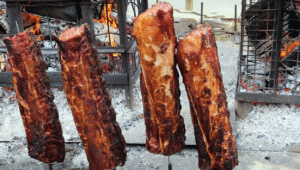
Master Techniques for Spit Roasting
 Spit roasting is the oldest, most time-tested method and has been employed across nearly every culture. There are many different traditions and techniques that can be employed, but they all come down to the same basic premise: a cut of meat, or prepared whole animal, rotating over a medium-to-low heat fire for many hours.
A Brief History of Spit Roasting
Turning the meat has long been a chore that consumed entire workdays for households. During the Middle Ages, massive cuts of spit-roasted meat would feed a nobleman and his entire household. Young male servants called spit jacks were given the onerous duty of slowly rotating the meat for hours at a time until it was properly prepared.
Later on, innovators would power spit rotation via dog-powered treadmills, mechanical clockwork, steam, and eventually electric motors.
Despite these innovations though, many spit roasting grill masters still prefer the manually turned spit.
Why is spit roasting still so immensely popular, despite the labor involved? Here are just a few of the reasons:
- Slowly rotating meat on a spit makes it brown and caramelize evenly over the entire surface.
- Spit roasting allows meat and poultry to self-baste as their melting fat and juices are recirculated through the meat over and over as they roast over the flames.
- Spit roasted meat is always cooked evenly
- The slower you cook meat, the more tender and succulent it will be
- Spit roasting can be done over charcoal, gas, wood, on a campfire, or even in a fireplace.
How to Spit Roast Meat
Here’s a basic how-to for spit roasting, including how to prep your meat, set up your rotisserie, and tips for cooking:
Preparation

Start by prepping your meat for the rotisserie in such a way that it is as cylindrical as possible. Poultry should be trussed, roasts should be tied, and legs of whole animals should be bound with string or twine. The floppier the load on the spit, the more unbalanced and uneven the cooking will be.
Loading the Spit
As you start loading the spit, begin by putting one fork on with the prongs facing the center of the spit. Thread the food on the spit through the center, then insert the other fork into the spit to secure your food. Make certain that the weight of the food is centered and balanced properly on the spit. Ensure everything is balanced and rotates properly before tightening the screws on the prongs for the spit.
Cooking with a SpitWhen spit roasting over charcoal, use the indirect heat method, and place a drip pan directly beneath the spit.
Attach the end of the spit to your motor socket, making any necessary adjustments to the load and counterweight so that the food spins evenly. Be sure to add fresh coals every hour as needed.
For campfire spit roasting (this is prohibited in some areas, so check your local laws and regulations), rake your embers into a rectangle that lies just behind the rotational axis of the spit. Place a drip pan underneath where your food will be cooked, and add more coals as needed during cooking.
Rotisserie cooking of meat is extremely popular for South American style meats, especially in Brazil. If you decide to give spit roasting a try, Brazilian rubs, sauces, and marinades are all an excellent way to add a touch of the exotic to your next cookout.
You can also easily acquire what you need online, and there are even kits that allow you to adapt existing charcoal or gas grills for spit roasting as well.
Master Techniques for Smoke Roasting (Smoking) Meat
Smoking meat, fish, and other dishes is an excellent way to both preserve food for storage and give it a deeper, smokier flavor that you cannot achieve any other way. This is definitely among the most time-consuming method of cooking meat outdoors, but the flavors and tenderness of what you prepare are beyond compare.
Nothing else tastes like smoke roasted food, and it is well worth the extra effort it takes to prepare!
Managing Flavors When Smoking Meats
You will need a meat smoker in order to prepare your meat using this technique. Being able to slowly smoke roast your own meat or fish has definite advantages, especially if you want your next cookout to be especially memorable.In terms of flavors, you will need to decide which flavor you are looking for when initially choosing your wood chips / chunks.
If you are looking to prepare stronger flavored meats, then oak, mesquite, and hickory should be your first choices.
If you are looking for a smoother and more subtle flavor, then apple, pecan, and cherry wood are best.
How To Use A Vertical Smoker
Here’s how to use a vertical smoker to prepare succulent, delicious smoked barbecue:- Inspect the interior of your smoker to verify that both the insides and the water pan are clean.
- Set your charcoal grate in place at the bottom of the smoker.
- On cold days, load two chimney starters filled with briquettes on the top of the coal grate and ignite them using firelighters.
- On warmer or hot days, a chimney and a half should more than suffice.
- Be sure to wear gloves when handling chimney starters.
- Carefully pour them into the charcoal chamber and spread them evenly. Briquettes in a smoker will typically last up to 8 hours.
- Set the water pan and cooking grate in place, then slowly pour a gallon of water through the cooking grate into the water pan.
- Ensure that all vents are open, and wait for the thermometer to read between 200 -250 degrees Fahrenheit before putting any food on the grill.
- You can place food on both the lower middle grate and the upper grate. Keep in mind that the top grate usually cooks at around 15-20 degrees hotter than the lower grate.
- Open the charcoal grate access door and add your wood chunks / chips to the hot coals. You should only need 4-6 chunks or 2-3 handfuls of chips to last an entire cooking cycle.
- Place the lid on your smoker and keep an eye on the temperature for at least half an hour to make sure it doesn’t get too hot or too cool.
- Check the temperature every 15 minutes in order to keep it in the ideal “smoke zone” of 200-250 degrees Fahrenheit. Opening the bottom vents increases temperatures, whereas closing them causes the temperature to drop as the smoldering coals begin to become starved of oxygen.
- Add water about every two hours as necessary: Add boiling water to maintain your roasting temperature.Be careful not to overfill the water pan, as spilled water will create an ash cloud that will sour your food.
- Keep the lid on the smoker as much as possible. Every time you open the lid, flavor is lost and cook time increases. You should only remove the lid if foiling, basting, or removing the meat for carving. Furthermore, you should turn meat only once during cooking to ensure the best possible flavor.
Summary
These are the grilling techniques that will make you the undisputed king (or queen) of the cookout. Neighbors and friends will be rearranging their social calendars to attend your outdoor meals, and the better your technique, the more refined and exceptional your grilling will become.
Learn to master these methods of grill magic, and ascend to your rightful place as Grand Grill Master in Chief for your circle of friends, family or neighborhood!
Share your grilling techniques on Twitter, Facebook or Instagram.