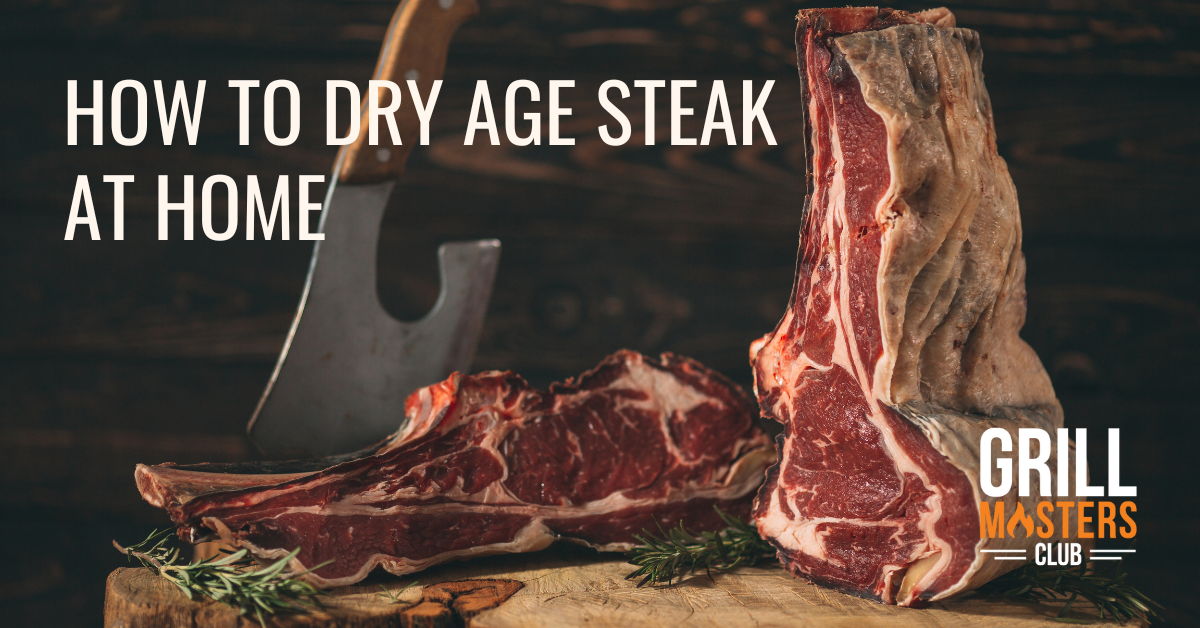
Guide: How To Dry-Age Steak at Home
Shop BBQ Sauces & Rubs
If you’re wondering if you’ve ever tasted dry aged beef, then you clearly have not. The flavor is unforgettable -- it’s the umami-equivalent of High-Definition vs. Standard Definition TV.
If you’ve eaten dry aged steak, you’re fully aware of it’s unpredictable, indescribable flavors.
Since it’s so delicious, why don’t you eat it on a weekly basis? The answer: Money. 
Patience is a virtue. Excellence takes time. If you order dry-aged beef at a restaurant, you will realize this experience is not cheap. You aren’t just paying for the meat. You are paying for the 28 to 75 days that slab of beef spent aging in a climate-controlled environment.
But if you’re a member of Grill Masters Club, a monthly BBQ subscription box, you understand that grilling is not a cooking style. It’s a lifestyle. You are here to take your own cooks to a new level. Look no further than dry aging your own beef.
Read on and we will show you how to dry-age beef at home. Once it’s ready to slap on the grill, we’ll tell you the best way to prepare it. The best way to eat---you’re on your own there. That’s personal.
Before we get to that, here’s a quick primer on dry-aged beef.
What Is Dry-Aged Beef?

What is dry-aged beef? Why the high praise?
Dry-aged beef spends weeks in a cool, dry place, slowly aging. With time, muscle fibers tenderize and flavor evolves. The result is a velvety texture with aromas ranging from salty, sweet, savory and nutty. The process is reminiscent of an aged Scotch, wine or fine cheese.
The flavor is otherworldly in its boldness and intensity compared to other meats. Eating a dry-aged steak is a premium culinary experience.
The process depends upon high-grade meat with evenly-distributed fat. The moisture in the fat evaporates from the meat, intensifying the classic beef flavor.
Enzymes within the beef break down the muscle fibers, tenderizing the meat. Those enzymes also influence the flavor profile, comparable to the way enzymes generate cheese like gorgonzola.
This process takes 15 to 28 days, and the evaporation cuts the weight by a third -- hence, the expensive nature of eating dry-aged cuts at a gourmet steakhouse.
Before you dry-age your own beef, it is worth sampling professionally prepared dry-aged beef. You need to know how high the bar is set, if you want to clear it.
That said, any excuse to eat dry-aged beef is welcome.
Dry aging beef is a very delicate process, so you will want to ensure that you are executing this perfectly. There are some signs that you should pay attention to, to ensure that your steak is safe to eat and has not turned bad. "How to Know if Steak is Bad" by CarnivoreStyle.com is a great resource to determine if your steak is ready to eat, or ready to toss!
The Required Tools for At-Home Dry-Aged Beef
Do-it-yourself dry-aging begins with a large cut of USDA Prime beef. This process needs to happen before cutting the roast into steaks.
Here is what you will need to dry-age at home:
- Stand-alone of Outdoor Refrigerator (dedicated to the dry-aged beef, there shouldn't be other products in there!)
- Fan (small)
- Tray
- Wire Cooking Rack
NOTE: The refrigerator is the biggest stumbling block for home dry-agers. By “stand-alone”, we mean that your beef is the only item inside the fridge. Other foods will alter the flavor of your beef. Opening the fridge door will change the moisture levels.
How to Dry Age Steak: A Step-By-Step Process

STEP 1: Temperature
Set the temperature between 34 and 38 degrees Fahrenheit, at 70 - 80% humidity, for 14 to 75 days.
STEP 2: Circulation
Once you select your dedicated dry-aging fridge, place a small fan inside to keep a constant airflow.
The wire rack will go on top of a tray, which will catch the drippings. Elevating the bottom rack will allow for airflow to reach the beef on all sides.
STEP 3: Placement
Next, place your cut of steak in the center of a wire rack. Slide that rack into the fridge with a tray beneath it.
STEP 4: The Waiting Game
Now, you wait. “How long,” you ask?
2-4 weeks = Tender beef.
4-6 weeks = Iconic dry-aged taste.
6-8 + weeks = If you want to experiment with unpredictable flavors.
Pro Tip: If you check on your beef, opening the fridge will skew moisture levels. Trust the process and leave it shut!
STEP 5: The Removal
Having aged your cut, take it out of the fridge. Your beef will have undergone a physical transformation by now. Your red slab of beef will now appear dry, deep-red to purple/brown in color, or even a moldy-looking exterior.
Fear not! Cut that meat off. Same with exterior fat.
STEP 6 : Carve It
Take your roast and carve up individual steaks to suit your tastes.
Be sure to use a different knife than the one that carved off the outer layers, or thoroughly clean the one you used. You don’t want any byproducts from the aging process contaminating your steaks!
Pro Tip: You will see the difference in the fiber of dry-aged beef when you cut your steaks.
Aging at home often limits your ability to control humidity, or makes it quite challenging. DIY dry-aging is a less precise science than professional dry-aging. You will struggle to replicate your favorite restaurant’s taste. So, don’t -- instead, savor the one-of-a-kind taste your DIY dry-aging process provides!
The longer beef ages, the more unpredictable the flavor…you will not know where the path leads until you travel it.
It's Time To Grill
If you’ve come this far, your patience is about to be rewarded.
Slap that delectably dry-aged steak on the grill.
The good news is you don’t have to go crazy with rubs or marinades. Just pure grilling to bring out the natural flavors the dry-aging process unlocked. Consider consulting a meat temperature guide if needed.
This part of the process is refreshingly straightforward.
The Reverse Sear Method
Employ a two-temperature grill. Set up a charcoal grill and a gas grill. For the charcoal grill, shift the coals onto one side. For the gas grill, maximize heat on one side while keeping the other half on low, or off entirely.
Related Guide: Grill Masters Club Ultimate Guide to Grilling Techniques
Once you remove the dry-aged beef, allow it to sit at room temperature for 15-30 minutes prior to grilling. Letting the meat sit on the counter is a step that’s easy to forget, but putting a cold steak on a hot grill tenses up the steak. After dry-aging for weeks, no one wants to sacrifice tenderness.
Five minutes before throwing the steak on the grill, season it. Keep it simple: Salt & black pepper, or a steak-rub from your Grill Master’s Club monthly grilling & box.
Related Guide: How to Apply Dry Rub Like the Pros
Place your dry-aged beef on the low temperature side, cover and cook. Every 3-4 minutes, turn the beef. Monitor the meat’s temperature with a thermometer.
At 15 degrees below desired doneness, move your steak to the high heat part of the grill. Sear uncovered, flipping as you see fit.
When your steak has a crunchy brown crust on both sides, take it off the grill.
Rest the steak on a wire rack over a sheet pan for at least five minutes before serving.
Old-School Grilling
Turn up the grill to high heat for rare, mid-rare and medium steak.
Grill at medium heat for mid-well and well-done steak.
- Rare-Sear = Grill one side and flip just before the “blood” starts to leach out.
- Mid-rare Sear = Flip steak until the “blood” droplets appear.
- Medium-Sear = Flip steak until the “blood” begins to pool.
- Medium Well-Sear = Flip steak until “blood” starts to run off.
- Well-Sear = Flip steak until all “blood” is gone.
Finishing Touches
Serve, enjoy. Remember to share the fruits of your labor! Dry-aged beef is meant to be savored. Chances are, though, the meat won’t last long, but the memory will linger forever.